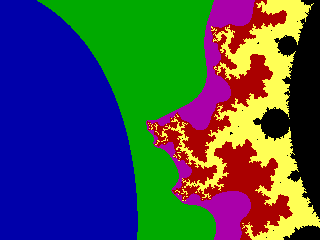
This is the first "zoom-up" I attempted on my PC, having successfully
produced a graphic of the whole set. It features the left-hand side of the
biggest "bump" hanging off the "bottom" of the M-set.
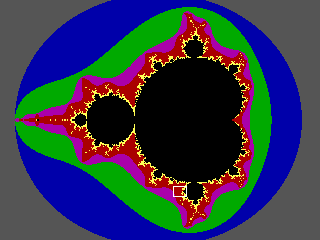
You can see the relevant area indicated by a small white box in the
following picture:
You've probably noticed that I've used the same colours, but that they don't
correspond exactly to the colour-pattern used in the "whole-set" graphic.
This is typical of how zoom-ups of the M-set (and other fractals) are
normally done; the idea is to apportion the chosen colours in such a way as
to look attractive and draw the eye to features of the picture at a level
appropriate to its dimensions.
You can download and save a copy of the BASIC source-code for the 640 x 480
version by right-clicking
here.
If you examine this program, you'll see that I've increased the iteration
limit from 100 to 1,000 - which gives a good result at this level of
magnification.
Notice that I've fixed the bug referred to in the program for the
"whole-set" graphic: 640 has been replaced by 639, and 480 has been replaced
by 479.
Also, note that the scaling commands involve division by 639 (rather than
640) for the x-values, and 479 (rather than 480) for the y-values. Why?
Well, as I see it, the distance from the centre of the left-most
pixel to the centre of the right-most pixel is 639 pixels; so that it
makes sense to divide the total distance by 639. Similarly, 479 is an
appropriate divisor in the vertical direction.
I realize that it may be possible to make a case for dividing by 640 and
480, respectively. To be honest, I'm self-taught in this area and I may
quite possibly be "breaking the rules". Having come this far, however, I'm
sticking to my guns! (Anyway, any difference it could make to the actual
picture must be minuscule.)
If you're wondering how I put that small white rectangle in exactly the
right place to show the location of the next picture, you can right-click
here
to downlaod a copy of the BASIC program I used. It produces a 320 x 240
graphic in the top left corner of the screen. A screen-save, followed by
cropping, gave me the image I wanted.
You'll find more of the same sort of thing in the following pages in this
collection. No source code is provided for the rest of them; I'm going to be
the cranky author who says "this may be left as an exercise for the reader".
My home page
Preliminaries (Copyright, Safety)
Mandelbrot set: Region #2

Click on the picture to see a 640 x 480 pixel version.


 Return to
Fractals #1: the Cantor and Mandelbrot sets

