
During the 1960's, Time-Life International published a series of books
called the
"Life Science Library".
These were hardbacks, quite large (11 by 8.5 inches), about half an inch
thick, with about 200 pages; glossy, colourful books with lots of
high-quality photographs. Around 1963, a book in this series entitled
"Mathematics", by
David Bergamini,
was published. I found this book somewhere - possibly in a library, either
public or school - and was immediately intrigued by it.
I persuaded my parents to obtain a copy for me, and if my memory serves me
correctly I received it as a Christmas present in 1965 or (possibly) 1966.
By this time, my parents already thought I was a bit strange; this was
confirmed when I insisted on taking the book with me when we went on our
annual summer holiday jaunt to the beach!
In late June, 2005, I spent several hours removing the now no-longer-sticky
tape, which had gone brown and left nasty stains everywhere. I finished the
job started by time and pulled all the pages out - being extremely
careful to minimize any further damage - and mounted them in a modern
display book, thus (hopefully) preserving the poor old thing for the
foreseeable future with little or no further deterioration.
The photograph you see above is of the empty cover!
The book essentially provided a historical overview of mathematical thought
from ancient times up to the present (or, at least, the present as it was in
the mid-1960's!). Plenty of good stuff there to interest me: Fibonacci
numbers and the Golden Ratio; conic sections; intriguing graphs of special
functions and relations - and, best of all, a lovely, colourful section on
topology.
The classic Möbius strip was there, of course, along with the contention
that a topologist is a person "who does not know the difference between a
doughnut and a coffee cup". There was a series of diagrams showing how (in
theory, at least) it's possible to turn an inner-tube inside-out. But the
thing which really caught my eye was a gorgeous photograph, on page 183, of
a beautifully blown glass Klein bottle, owned by topologist
Albert W. Tucker
of Princeton University.
This Klein bottle still exists! It's owned by Tom Tucker, one of Albert
Tucker's two sons. (Both Tom and his brother Alan are also mathematicians -
"good on 'em", as we say "down under"!) Furthermore, a modified version of
the photograph mentioned above is featured on
this website
.
I urge you to visit this page before reading further, and have a good look
around, so that you know what we're talking about here. Also, click on the
link to the ACME site, which is a lot of fun. (No - I'm not being
paid anything to advertise their products.) Also, there's a link to a
biographical page about Albert Tucker (1905-1995).
The Klein bottle is named after German mathematician
Felix Klein
(1849-1925).
I dreamed of someday having a Klein bottle of my own; and eventually I did.
During the mid-1970's, Hobart had the definite feel of a cosmopolitan
university town. These were heady days, and anything seemed possible. The
nightmare of corporate and economic
globalism
and the so-called "level playing-field" had not yet been imagined by
ordinary people; and multinational corporations were widely viewed with
richly-deserved scorn, instead of being appeased, coddled and pandered to,
as they are now. (Very few people back then would have been seen dead with
brand-names on their T-shirts.)
It was an atmosphere in which individuals with some imagination and drive
could make a real contribution, and attract some respect and affection while
making a living in a creative way. In 1976, when I was at university, there
were some very talented glass-blowers operating in Hobart. Some of them had
established themselves with particular shops in the city, and could be seen
in the shop-window or just inside the doorway, sitting at a table with a
burner - and surrounded by intricate and beautiful glass objects, which they
produced right there on-site.
I approached one of these artists and asked if he could make a Klein bottle for me. He immediately knew what I meant, without any need for explanation
on my part; and he told me that he had in fact recently made one for a
customer. He said that it was a tricky operation, and that it would cost me
a bit. How much? Fifteen dollars. (It must be said that $15 went a lot
further in those days than it does now!)
I said yes, please; and he told me to come back in a day or two. I did; he
had produced the requested item, and showed it to me. He wasn't altogether
satisfied with it, and said that he'd be quite prepared to make another one
and do a better job if I could wait a bit longer. (A true artist, and a
perfectionist to boot - more power to him!) I said no, it was just fine;
happily paid him the $15, thanked him, and took the treasure home.
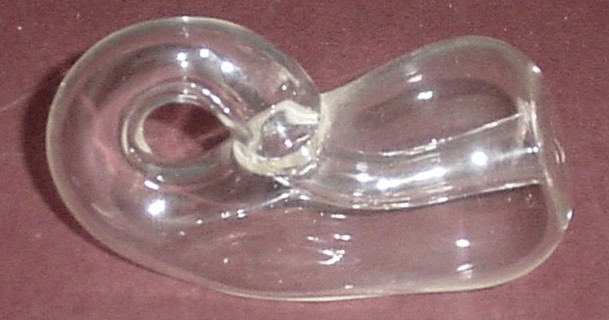
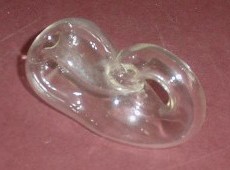
I've looked after this little beauty very carefully for almost three
decades. Here it is:
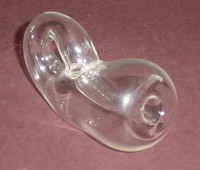
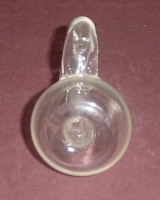
- and some other views:
It's 11cm long, and has a maximum diameter (across the "bulb") of 5cm.
(By the way, this funny little thing has a guest appearance in one of the
other pages in my website - keep hunting, and you're sure to find it if you
haven't already.
I never thought to stay in touch with the glass-blower, or even find out his
name. If he's out there, and is reading this page and recognizes himself
and/or me and/or the Klein bottle, perhaps he might like to
contact me
and we can reminisce about the direction the world seemed headed in those
happy and innocent times, when greed was not yet seen as a good thing...
So, what's the big deal about Klein bottles? What's so special about their
structure?
(I don't mean the actual techniques used to make models out of glass -
although I'm sure that's an interesting subject in itself. What I want to
address here is their mathematical significance.)
It's probably easier, by way of introduction, to describe first the
structure of a related surface: the torus, an object basically shaped
like a tyre.
Imagine that we start with a rectangle of thin, tough, very stretchy
material - so that we can manipulate it, without any risk of tearing it,
into any shape we like. Assume also that we can also glue this material to
itself.
First, roll it up into an open-ended cylinder, and glue the top and bottom
edges together. Then bend the cylinder around so that its circular ends
(formerly the rectangles's left and right edges) coincide, and glue them
together also. (On
this page
,
near the bottom, you'll find a series of diagrams illustrating this
process.)
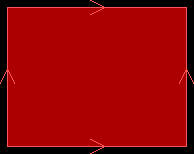
The arrows pointing in the same direction (to the right) along the top and
bottom indicate that the left-hand end of each is joined to the left-hand
end of the other, and similarly for the right-hand ends. Again, the arrows
both pointing in the same direction (upwards) along the sides show that the
upper end of each is joined to the upper end of the other. (After the
rectangle has been rolled up into a cylinder in one direction, the other
pair of edges form closed curves, with their arrows pointing in matching
directions.)
The result is something like a doughnut - but an empty doughnut; just
the surface, with no actual dough inside. (It wouldn't be very exciting to
eat.)
Of course, you could equally well join the left and right edges first - to
make a vertical cylinder - and the top and bottom edges (which would then
have become closed curves) second - and this would produce an essentially
similar shape.
This surface is interesting in its own right - more so than you might think.
If you could transport it into four-dimensional space, you could turn it
inside out! - and, if you "cheat" by making a hole (or puncture) in the
surface somewhere, you can actually do this in the more familiar
three-dimensional space. (As I mentioned earlier, David Bergamini's book
"Mathematics" contains a series of diagrams showing how to do this.)
This web-page
addresses the inside-out torus problem (in addition to a number of other
mathematical amusements; you'll have to scroll about two-thirds of the way
down the page to find the torus - but it's worth it). The diagrams bear some
resemblance to those in Bergamini's book. Also, a related tricky matter
involving linked loops on the surface of the torus is discussed rather well.
(That's enough in the way of "teasers" from me - go and have a look at it
yourself!)
UPDATE, Friday, 24th September 2010
That page seems to have disappeared (which is a pity, because it was a good
one). I'll try and find if it's still out there on some other server (do
please
contact me
to let me know, if you've seen what you think might be it somewhere else).
In the meantime, that link can stay (in case it comes back); but there are
now quite a few other pages on the web which deal with the
eversion
of a punctured torus.
This
Wikipedia page has a good animated gif, produced by someone named "Surot",
which shows the process actually occurring. It's in the public domain, so
I thought I might as well place it here (thanks, Surot!). This is the
slightly smaller, "thumbnail" version of the animation; click on the link
just given to see the larger version:
(Sort of makes you feel like yawning, doesn't it?!)
Some other pages which contain relevant animations or still graphics
are as follows:
http://www.segerman.org/2ndlife.html
http://xahlee.org/sl/sl_math3.html
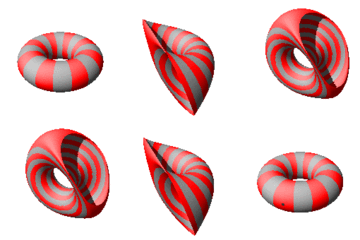
If you'd like to "see" an intact torus (i.e. without any punctures) in four
dimensions turning inside-out, visit
this page
and view the last of the four movies presented there (you have a choice of
mpeg, Quicktime, or animated gif - I got 'em all!
- - - - - - - - - -
The important thing for us at the moment is that a torus has two "sides" -
an inside and an outside. (That's not just a play on words; if you go back to
the idea of making a torus from a rectangle, as described above, it's clear
that the original rectangle itself has two sides.)
Okay - so what does all this have to do with Klein bottles?
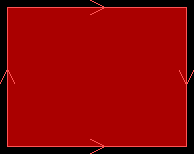
Take the rectangle shown above - but reverse the arrow on one of its side
edges (we'll do this on the right-hand edge).
Roll it up as before, so that the top and bottom edges come together, and
glue them. Note that the arrows on the ends of the resulting cylinder now
point in opposite directions. Next we want to join these ends so that the
arrows "agree". How can this be done?
If one end (the left-hand end, say) could be somehow pushed through the wall
of the cylinder without making a hole and joined to the opposite end
from "inside", the arrows would agree. The resulting surface would then be a
Klein bottle.
Sounds easy, doesn't it? The only problem is that we're not allowed to make
a hole in the side of the cylinder, if we want it to retain its
topological properties - and this can't be done in three-dimensional
space. The only way to make a real Klein bottle is to do it in four
dimensions. (No, I can't visualize it either!)
Albert Tucker's Klein bottle, or mine, or any produced by ACME or anyone
else, are not strictly correct Klein bottles, because of the hole. Still,
they're a bit of fun, which is why some of us weirdos like to own such
things. At the very least, they provide a talking point!
Let's imagine that we live in a four-dimensional world, and think a bit
about the implications of Klein bottles. One question which suggests itself
is: what would happen if we cut one in half?
By this, I mean cutting it "straight down the middle", so that it falls into
two pieces which are mirror-images of each other. Look back at the second of
the three small photographs of my Klein bottle. Imagine you had a
large, really sharp knife, capable of cutting glass without shattering it,
and brought it down - wham! - so as to slice the poor thing neatly
into two halves. What would the properties of each half be?
(Note: NO WAY am I going to allow anyone to wreck my little treasure.
Use your imagination - or get your own Klein bottle, and wreck that!)
Actually, if you've got an old sock with holes in the heel and toe, you can
make a simple model of a Klein bottle quite easily. Stick the toe end
through the hole in the heel, and sew the "toe-hole" to the top end of the
sock. Then use a sharp pair of scissors to slice it neatly in half
lengthwise. What will you get?
You'll get two Möbius strips. (I've already made a brief mention of such
things earlier in this page.)
There can be few kids who haven't at least seen a Möbius strip (also known
as a Möbius band) at some stage in their young lives. They're easy enough to
make. All you need is a fairly long, narrow strip of paper and some glue.
You give the strip half a twist and glue the ends together. The resulting
somewhat contorted-looking object is a Möbius strip.
These are interesting in their own right. There are some very intriguing
things you can do with a Möbius strip and a pair of scissors.
Click
here
to visit a web-page which gives a good introduction to the subject. Also,
have a look at
this page
which goes into somewhat greater depth.
It's possible to draw a rectangular diagram of a Möbius strip, in similar
vein to those given above for a torus and a Klein bottle. Basically, it's
just the Klein bottle diagram without the top and bottom arrows:
The absence of those two arrows simply indicates that the top and bottom
edges of the rectangle are left free, i.e. not glued to anything (in
particular, not glued to each other). As can easily be visualized, the
half-twist imparted to the strip before the ends are joined will make the
arrows on the ends both point the same way before the join is made.
(It's easier to visualize if we imagine the rectangle as being long and thin enough to represent the actual strip of paper before the ends are
joined, so that we don't have any physical difficuties in doing so - but
recall that in topology, sometimes called "rubber sheet geometry", the
imaginary material from which our rectangle is made is very tough and
stretchy, so that - in theory, at least - the dimensions of the rectangle
don't matter at all.)
It's worth mentioning here that there are two different possible Möbius
strips, depending on which way the half-twist is made before the ends are
joined. (The rectangle diagram is the same for both, which is a limitation
of such a diagram.) As noted above, a "split" Klein bottle results in one of each, which are mirror-images of each other.
Now here's a surprise. Guess what? It's also possible to cut a Klein bottle
so that it becomes just one Möbius strip!
One way to see this is to work backwards. Choose a spot on a Möbius strip
and just start rolling it into a tube, gluing the "top edge" and "bottom
edge" together as you go, working your way along the length of the strip.
Eventually you'll run into a problem, when you reach a point near to where
you started. That's where, in your three-dimensional model, the surface has
to intersect itself; and that's where you have to stop.
If you're going to try this, it might be an idea to use a Möbius strip made
from a piece of flexible material - knitted wool, for example - sewing the
edges together, instead of gluing them. With something as inflexible as
paper, the twisting effect as you attempt this procedure may make it
impossible to complete satisfactorily; but with something fairly flexible
you have a chance.
What will you get? A Klein bottle!
You can also see this from the rectangle diagram for a Klein bottle,
presented here again, for convenience:
This time, instead of joining the top and bottom edges first (as
before), we join the left and right edges first - obtaining a Möbius strip.
Then, the second part of the process is to join the top and bottom
edges. What else could you end up with, but a Klein bottle?
(That argument is probably a bit dodgy as a mathematical proof, but I defy
anyone to show that the conclusion is false!)
Martin Gardner
,
who ran Scientific American's "Mathematical Games" column from 1956 to 1986,
published numerous books containing some of these articles. In "Martin
Gardner's Sixth Book of Mathematical Games" (W.H.Freeman and Company, 1971),
is a chapter (Chapter 2) entitled "Klein Bottles and Other Surfaces", in
which the author discusses some of the aspects mentioned in this web-page -
along with instructions for origami-like ways of folding paper into
structures which have the essential topological characteristics of (or are
homeomorphic to) a Klein bottle. Worth a read, if you can find a
copy.
(Here's
another link
about Martin Gardner.)
Also, have a look at
this page
which contains some very clever movies (mpeg's) which attempt to show Klein
bottles from both three- and four-dimensional points of view. (One of these
shows a Klein bottle cut in half, as mentioned above.)
More
movies here - and also, check out
this
You Tube video if you really want to be freaked out!
Here's
yet another page which shows a Klein bottle cut in half, and also gives a
set of parametric equations for a 3-D graph of a Klein bottle.
At this point it's worthwhile to consider other possible ways of assigning
arrows to the sides of a rectangle, leading to other possible topological
structures. To make life a bit easier, let's define two opposing sides to be
parallel if they have arrows which point in the same direction;
anti-parallel if they have arrows which point in opposite directions;
and a-parallel if neither of them has an arrow. (We require either
that they both have arrows, or that neither does - just one of
the sides having an arrow has no meaning in this context.)
Sorry - I can't resist this:
There is a similarity, in the way "a-parallel" means "not parallel", with a
certain aspect of the equestrian world: if a unicorn is a horse with
one horn, so that a bicorn is a horse with two horns -
then an acorn must be a horse with no horns. (Stick with me -
you'll learn a lot...)
At the risk of being tedious, let's review the possibilities we've mentioned
so far:
Torus
Klein bottle
Möbius strip
There are three other possibilities:
This is the "halfway point" when making the torus. Two edges (top and bottom
in this diagram) are parallel (as defined above), and are therefore glued
together; the other two are a-parallel, and are therefore left free.
This is very difficult to visualize. Both pairs of edges are anti-parallel.
First you'd make a Möbius strip; then you have to join the other edges with
a half-twist also. (We won't pursue this structure any further here.)
Very simple. Both pairs of edges are a-parallel; nothing is glued. This
structure is homeomorphic to a punctured spherical shell, or - equivalently
- to an "ordinary" bottle. (Can you see why, in each case?)
Of these six, three have both pairs of edges glued (the torus, the Klein
bottle, and the projective plane), whereas the other three (the plane, the
cylinder, and the Möbius strip) have at least one pair of edges free.
Some of these surfaces (plane, cylinder, and torus) are two-sided, in
the sense that each side could be painted in a different colour. The Möbius
strip and Klein bottle, however, are one-sided surfaces - which is
the most obvious reason why they are interesting. The Klein bottle is often
described as "the bottle with no inside". (The projective plane is also
one-sided; but, as mentioned, we won't discuss it further.)
The plane is a special case. Because no edges of the rectangle are glued, we
can replace all four with a single edge - a circle, for example - without
altering its topological structure. This single edge corresponds to a
puncture in a spherical shell, or the lip of an ordinary bottle.
(Note that the punctured torus - the one that we can turn inside-out in
ordinary three-dimensional space - cannot be represented by one of these
rectangle-type diagrams.)
UPDATE, Saturday, 25th September 2010
I've just discovered a
rather good Canadian web-page
which discusses in some detail - with simple but effective graphics - some
of the issues I've raised here about such things as Möbius strips, tori,
Klein bottles - even projective planes. Scroll about halfway down to the
section headed "5. INTERLUDE", and read from the second paragraph in that
section. A bit verbose, perhaps, but well worth reading nonetheless (and
anyway, who am I to complain about that?!
UPDATE, Thursday, 27th January 2011
While idly Googling (as one does) for topological thingies, today I've
found a rather neat web-page by a fellow who makes knitted models. He has a
Klein bottle-shaped hat; these are fairly common, I believe (I've seen a
few on the web) - but he also has a projective plane-shaped hat! Now
that's definitely something to see; have a look at his page
here.
Also note that he has knitting patterns for both hats as .pdf files which
you can download there! (It's such a relief to know that there are other
people out there who are just as weird as I am...)
It's interesting to consider some other surfaces which have one or more free
edges. Also, from now on, we'll allow the possibility of some of these edges
being knotted.
The simplest kind of knot is a trefoil knot. If you tie a simple
("overhand") knot in a piece of string, and then glue the ends together, one
of these two structures (mirror-images of each other) will be the result:
Note that these aren't identical - you can't manipulate the left-handed
trefoil knot into the right-handed one, or vice versa; see
this
Wikipedia page for more on this and other knot-theory topics. [Knot
theory is a complicated branch of mathematics; in "Topology" by John G.
Hocking and Gail S. Young (Addison Wesley, 1961), on page 175, the authors
point out that "a knot theorist uses topology, combinatorial analysis,
differential geometry, and anything else he finds applicable".]
We won't pursue the subject of knots further here. We'll restrict our
attention to these simple trefoil knots, without allowing ourselves to be
concerned whether they are left-handed or right-handed.
Okay - now we have enough "mathematical machinery" to deal with the next
topic I want to address.
At some point in my young life, I acquired Martin Gardner's book
"Mathematical Puzzles and Diversions" (Pelican, 1959). This was the first in
the series of which "Martin Gardner's Sixth Book of Mathematical Games" was
the sixth (duh).
In 1974 I started to read this book more carefully than I had previously. I
found Chapter 7, "Curious Topological Models", particularly intriguing.
Topics mentioned in the introductory first part of the chapter include
Möbius strips, double Möbius strips (made by starting with two straight
strips laid one on top of the other, giving them a half-twist
together and then gluing adjacent ends - one is shown on the front
cover of the book), tori (yes, that's the correct plural of "torus"!), and
Klein bottles.
Gardner then goes on to discuss surfaces with particular characteristics:
one-sided or two-sided; one-edged or two-edged; with or without knots in
edges.
It turns out that there are sixteen possible combinations. Gardner presents
a diagram for each one; some of them are simple (and have already been
mentioned above), but some are quite complicated and require a careful look
to see what's going on!
In early June, 2005, I decided to attempt to make models of each. After a
bit of head-scratching, I came to the conclusion that play-dough was a
suitable medium.
I made some of the models pretty much following the diagrams in the book.
Because of the somewhat floppy nature of strips of play-dough, however, I
had to re-draw some of the diagrams and use the results as a guide. I was
careful to ensure that the models I made were homeomorphic to those
presented in the book; but some of them appear rather different.
UPDATE, Tuesday, 18th August 2009
I've just discovered a review of "Hexaflexagons and Other Mathematical
Diversions: the First Scientific American Book of Mathematical Puzzles and
Games" by Martin Gardner, which contains the original article about these
surfaces; click
here
to see it.
Having made each model, I took a photograph of it with a borrowed digital
camera. These are presented below, each accompanied by a diagram and a few
explanatory comments. (By the way: strictly speaking, the surfaces should
have no thickness. It's very difficult to make strips of play-dough with no
thickness, however - and the "edges" look more like extra surfaces than
edges! So, please, use your imagination and give old Teddy a bit of leeway,
okay?)
In the following diagrams, a one-sided surface is green; a two-sided surface
has one side green, the other yellow; if there's only one edge, it's red;
and if there are two edges, one is red and the other blue. (If a surface is
two-sided, I've emphasized the fact by making sure that at least some of
each side is visible - i.e. some green and some yellow.)
Your basic Möbius strip!
Three half-twists create the knot. The fact that the number of half-twists
is odd means that the surface is still one-sided.
Homeomorphic to the plane, or punctured sphere. As mentioned, the half-twist
is just there to show both sides; it doesn't actually do anything.
Again, three half-twists create the knot; but this time the way they are
arranged - in separate sections - leaves the surface two-sided.
This can be thought of as a "punctured Möbius strip". The puncture provides
the second edge (the blue rectangle, in this diagram).
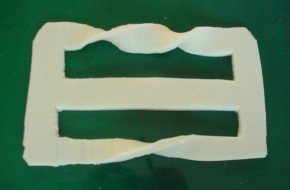
As in 5. above, but with a whole twist (i.e. two half-twists in the same
section) which creates the link.
This time, two one-and-a-half twists (i.e. three half-twists in each of two
sections) create the knots. (Getting a bit complicated, isn't it?)
In the same way that the whole twist in 6. links the two un-knotted edges in
5., the two knotted edges in 7. are linked here.
A bit less complicated this time: the simple edge (red) is around the
outside, while the blue edge is knotted by a one-and-a-half twist.
As in 6. and 8. above, a whole twist transforms the previous surface by
linking its two edges.
Very simple: homeomorphic to an open-ended cylinder. (Think about it!)
As in 11. above, but with one of the half-twists reversed so as to make a
whole twist which creates the link.
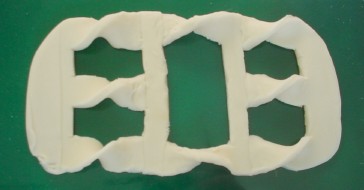
This rather complicated-looking surface is really just two examples of
surface 4. joined together.
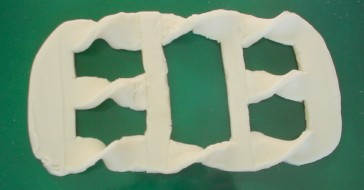
Almost identical with 13. above, but with one half-twist reversed, thus
linking the two edges. (Looks good enough to eat, hmm...?)
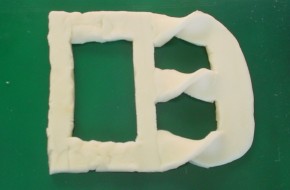
Effectively, this is surface 4. with a puncture, which thus becomes the
simple edge.
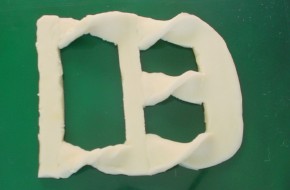
Essentially this is surface 15. with an extra whole twist (done as two
half-twists), which links the edges - just as in surfaces 6., 8., and 10..
At the end of the chapter, Martin Gardner presents a challenge: is it
possible to make a surface of this general type - i.e. with no
self-intersection - with three edges, locked without being linked,
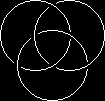
as in the famous
Borromean rings
symbol?
In 1974, I did construct a flimsy thing from strips of paper which I still
believe met the criteria. However, it's a long time ago, and I can't
remember how I did it; and - silly me - I don't have it any more, nor any
notes on how I made it.
I found
this web-page
which contains a photograph of a surface which may be a valid solution to Gardner's challenge; have a look.
Another photo on that page is also of interest. Imagine a torus with a knot
in it. You could make such an object by starting with a length of flexible
pipe, tying a knot in it, and gluing the ends together. Now: is it possible
to turn this inside out - either in four dimensions, or by making a
puncture and then doing it in three dimensions?
Indeed it is. The result is a torus with a knotted hole! You'll find a
picture of a model on the web-page just mentioned.
Is it possible to have a torus knotted in the "ordinary" way, and also with
a knotted hole?
If I'm reading
this page
correctly, the answer appears to be "no". (I'll admit to being somewhat
out of my depth here.)
Finally: some comments about the nature of the mathematical discipline of
"topology" itself.
Having become interested in this "rubber sheet geometry" as a kid, because
of the surprising - almost magical - nature of the odd things that it
describes, I was pleased to find that a subject called "topology" was, from
time to time, offered as a third-year mathematics subject at university.
Having (eventually) managed to pass the second-year mathematics subjects by
1975, I enrolled in the topology class in 1976 (the same year I bought my
Klein bottle), looking forward to a full mathematical treatment of Möbius
strips, tori, Klein bottles, knots, and so on.
Well, was I in for a shock. None of these things even rated a mention!
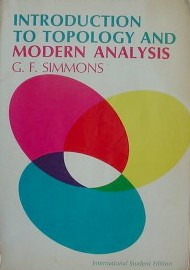
The recommended textbook, "Introduction to Topology and Modern Analysis" by
George F. Simmons,
1963 (McGraw-Hill Book Company / Kogakusha Company), only introduces the
very term "topology" in Chapter 3 - "Topological Spaces" - on page 94,
about a quarter of the way through the book.
In the first two chapters, "Sets and Functions" and "Metric Spaces"
(respectively), such matters as countable and uncountable sets, convergence
of sequences and completeness of a metric space, and continuity are
described. (The Cantor set, discussed in my
Fractals #1
page, is mentioned in Chapter 2.)
In Chapter 3, the very abstract and formal definition of a
topological space
is given, along with that of
homeomorphism.
Next, the term "topological property" is intoduced: a property which, if
possessed by a particular topological space, is also possessed by every
homeomorphic image of that space.
The subject "topology" is then defined as "the study of all topological
properties of topological spaces". Only then does Prof. Simmons mention,
very briefly, the idea of the rubber sheet, with a few comments about the
nature of the things dealt with in this web-page. He then points out that
this sort of thinking is the reason why "topology is often described to
non-mathematicians as 'rubber sheet geometry'".
Chapter 4, "Compactness", introduces an abstruse concept, the full
importance of which I'll admit still causes me some difficulty. The
basic definition can be stated as follows: A compact topological space is
one in which every open cover has a finite subcover.
If you'd like to read a bit about compactness, and thus perhaps gain an idea
of the flavour of point-set topology, visit
this Wikipedia web-page,
and also
here
(a link in that page). Don't be too worried if these articles leave you
scratching your brain - these ideas are not easy to get one's head
around!
Chapters 5 and 6 are entitled "Separation" (see Wikipedia article
here)
and "Connectedness"
(here)
respectively. These, it seems to me, are easier to grasp than compactness;
but - in subsequent chapters - again, things become rather difficult to
understand.
Are you getting my drift? This approach to topology - sometimes called
"point-set topology" (mentioned above) - is a very abstract, formal matter.
The concepts are hard to visualize; indeed, the impression is given (as in
other areas of pure mathematics) that visualization cannot be relied upon as
an aid to rigorous thinking.
Fair enough - I take the point. But I still believe that visualization is
very important from the point of view of motivation.
I do feel that the tide is turning. Probably, no-one has had a greater
impact in making abstract mathematics more accessible and appealing than
Dr. Benoit Mandelbrot, who, a quarter of a century ago, opened a door onto
a fascinating, colourful world that had previously only been able to be
imagined by fully-trained mathematicians. The rewards have always been
great, but the price to be paid to even glimpse them has always been very
high - until recently. It now appears that mathematicians, while still
rightly insisting on the importance of rigour, are more prepared to
take a "softer" approach - at least in the early stages, when students need
to be drawn into the abstract world fairly gently, if many of them are not
to be totally intimidated. - And I'm in good company; click
here
to read some quotes by the great Felix Klein himself (that's right - the
Klein bottle's "discoverer"!) on this and related topics.
You can see my contribution to the Mandelbrot set literature on my
Fractals #1
page, along with my take on the Cantor set. Just by the way: I mentioned
connectedness earlier; the Mandelbrot set, viewed as a topological
space, is connected. Computer graphics don't prove this - but they
do help in making it easier to visualize. (On the other hand, the Cantor set
is
totally disconnected.)
The topological ideas that I have presented in this page have more to do
with "algebraic topology" than with "point-set topology". If studied
seriously, this other branch of the subject still demands clear, rigorous
thinking, in order not to make silly mistakes. But it's certainly more
accessible and intriguing to the lay-person, which is basically why I've
included this page featuring some concepts from the subject.
The book "Topology", by John G. Hocking and Gail S. Young (mentioned
earlier), presents a quite attractive introduction to algebraic topology.
Compactness - my old sparring partner - is in there, along with other
difficult stuff; but there's also enough of a motivational nature to
sweeten the pill.
To close, a couple of matters:
With the benefit of hindsight, and with some level of hard-won
understanding of mathematical concepts, I can now browse through Simmons
with some pleasure. In all fairness, it must be said that, for a work of
its time, it's actually somewhat easier to read than a good many other
higher mathematics textbooks I've seen. Also, I've always liked the simple
"overlapping colours" pattern on the cover. (Just a thought: although that
pattern may have nothing whatever to do with the book's subject matter, it
is somewhat reminiscent of the Borromean rings. Coincidence...?)
- And, yes, I did pass Topology (the university subject); but it took me two goes. I failed it the first time, but eventually passed it at a
supplementary exam!
After 31 years, I've finally succeeded (again!) in making a surface with
three edges which bear the same relationship to each other as the Borromean
rings. Click
here
to read more...
My home page
Preliminaries (Copyright, Safety)
A taste of topology
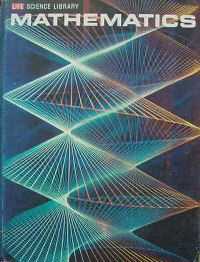 I still have it. Over the years, it basically fell to pieces (it must be
said that the binding was atrocious); some years ago I attempted a rescue by
using lots of sticky tape, which turned out not to be a good idea.


 UPDATE, 28-9-2010:
It now appears in two other pages! I've just added a picture of it
into another one...)

 ). Eye-popping stuff! Check out the other movies
there too...


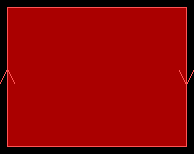


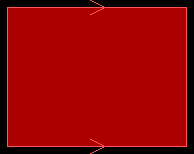
Cylinder (open-ended)
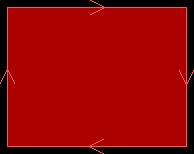
Projective plane
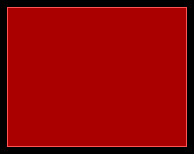
Plane
 ).
).


GROUP A - one-sided, one-edged
 1. The edge is a simple closed curve (i.e. not knotted)
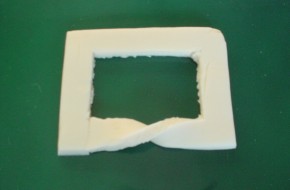
_________________________________________
 2. The edge is knotted
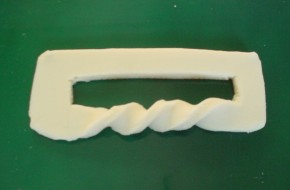
_________________________________________
GROUP B - two-sided, one-edged
 3. The edge is a simple closed curve
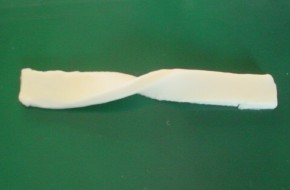
_________________________________________
 4. The edge is knotted
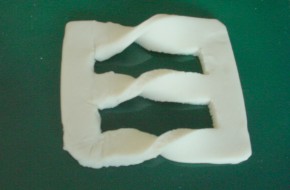
_________________________________________
GROUP C - one-sided, two-edged
 5. Both edges are simple closed curves, unlinked
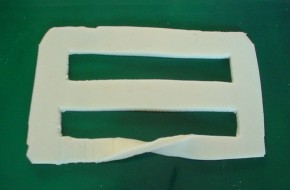
_________________________________________
 6. Both edges are simple closed curves, linked
_________________________________________
 7. Both edges are knotted, unlinked
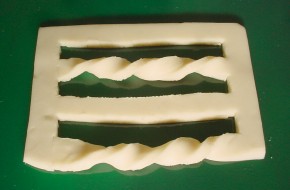
_________________________________________
 8. Both edges are knotted, linked
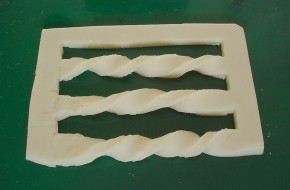
_________________________________________
 9. One edge is simple, the other knotted, unlinked
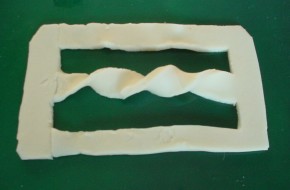
_________________________________________
 10. One edge is simple, the other knotted, linked
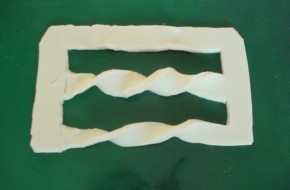
_________________________________________
GROUP D - two-sided, two-edged
 11. Both edges are simple closed curves, unlinked
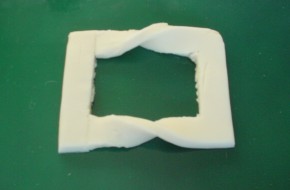
_________________________________________
 12. Both edges are simple closed curves, linked
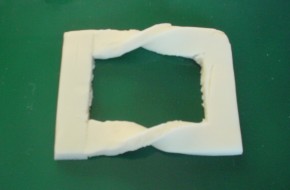
_________________________________________
 13. Both edges are knotted, unlinked
_________________________________________
 14. Both edges are knotted, linked
_________________________________________
 15. One edge is simple, the other knotted, unlinked
_________________________________________
 16. One edge is simple, the other knotted, linked
_________________________________________

(Thanks to Professor Simmons for permission to include this scan.)


 UPDATE, mid-September 2005

 Return to Mathematical stuff menu

